Originally posted 30th September 2019
Last updated 13th June 2023
How to Lay Flooring on a Concrete Subfloor
As subfloors go, concrete isn’t the easiest to deal with and it can be somewhat...

As subfloors go, concrete isn’t the easiest to deal with and it can be somewhat difficult to know where to start when laying any type of flooring on concrete. However, concrete is compatible with all floors. So, whether you go for vinyl or wood, here is a handy guide to laying flooring on concrete.
1. Prepare the Subfloor
This sounds fairly tedious, but if you don’t properly prepare your concrete subfloor, it could lead to problems later on. For example, separation, as well as creaky or uneven floorboards.
First and foremost, it’s essential to conduct a moisture test to ensure the moisture levels are as low as possible. If your moisture meter reads too high, allow your subfloor to acclimatise. Concrete can take around 1 full day to dry for each 1mm of thickness. So, ensure roughly 72 hours, just to be on the safe side. If you find your floor’s moisture levels are still high, choose a Moisture Barrier Underlay which will help.
Once your floor is dry, the next step to take is to make sure it is clean. Start by sweeping away any dirt or debris on your subfloor. Then scrape any existing paint or glue off your subfloor. Use a scraper or sandpaper if certain substances are proving especially difficult. Hoover afterwards to ensure your floor is completely clean and free of bumps.

2. Lay the Underlay
The next step is to install your underlay. Simply put, underlay is a thin layer of foam that goes in between your flooring and your subfloor. It helps add insulation to your room and makes the installation process easier. We offer a range of underlays with different purposes, depending on which type of flooring you intend to install. For example, we offer Laminate Underlay and Engineered Wood Underlay.
If you’re installing vinyl flooring, such as Karndean, you won't need to use underlay as Vinyl flooring has a cushioned design. The same goes when installing solid wood flooring, which doesn’t usually require underlay and can go directly onto your subfloor. However, you will need an underlay for lino flooring on concrete on the form of a thin vapour barrier to protect it from moisture.
To install your underlay, measure how much you need and cut the underlay into strips, add at least 5cm extra to give yourself some space. Place the underlay side by side and simply tape together so no parts overlap. Also, tape the underlay at the seams. Be sure to trim parts down with scissors if need be.

3. Install the Flooring
The next and final step is to simply install your chosen flooring over the underlay. While it sounds easy, different types of flooring will have different installation processes. Whether you’re dealing with engineered wood, vinyl, laminate or solid wood, here’s the best way to go about it.
Laying engineered wood flooring on concrete
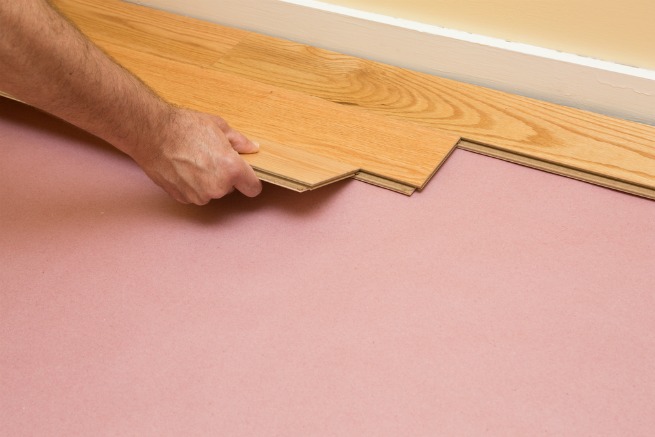
After measuring the length and width of the room, multiply those numbers together to calculate the room’s surface area, which will tell you how much Engineered Wood you’ll need. Engineered wood is fairly easy to install because it’s suitable for the ‘floating floor’ process, which means you can simply lay it without any nails or adhesive. If you have engineered wood with a tongue and groove system, they simply click together.
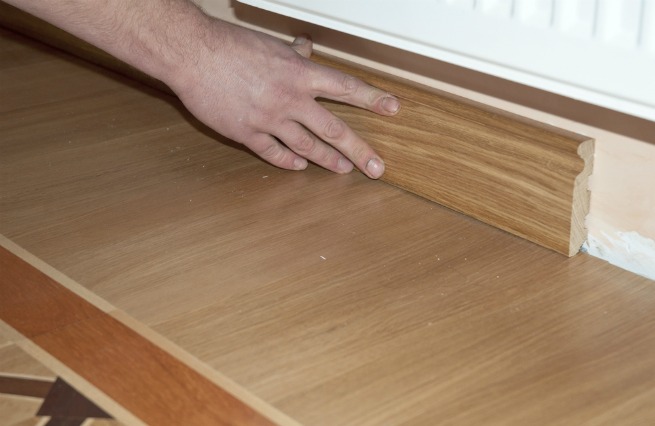
When laying, leave a perimeter of at least 10mm around the room to allow for an expansion gap. Slot each board into each other and tap into place using a tapping block and hammer. Afterwards, add beading which should be fixed in position with a hammer and nail.
How to lay vinyl flooring on concrete
As you don’t have to install underlay for Vinyl Flooring or LVT, this can go directly onto the concrete subfloor. However, allow 24 hours for your flooring to acclimatise by leaving it out of its packaging. When it’s ready, unroll your vinyl flooring and cut to size after measuring your room. It’s best to allow an extra 15cm, just to be on the safe side.
The installation method depends on the size of the room. For example, rooms less than 12 metres squared, can settle with a loose installation without adhesive. For rooms between 12 and 25 metres squared, use double-sided tape to secure the vinyl in place, we offer this in our Adhesive Section. Finally, for larger rooms over 25 metres squared, opt for glue. Again, our Vinyl Flooring Adhesive Section offers many adhesives that will help you. As you would with other floors, finish by adding beading with glue or a hammer and nail.
Laying laminate flooring on concrete
Once you've fitted your underlay you can start laying laminate on concrete. For Laminate Flooring, calculate how many packs you’ll need by working out the surface area of the room by multiplying the length and width together. If in doubt, add an extra pack to allow for any mishaps.
Like engineered wood, laminate flooring also has a simple click system. So, start by laying the planks onto your underlay from the left-hand corner of the room, clicking into place as you go. Remember to leave a gap of roughly 8-10mm around the walls to allow for expansion and space for your beading. Lastly, add in your beading or skirting.
How to lay solid wood flooring on concrete
If you’re going for a Solid Wood Floor, this will take the longest time to acclimatise, with roughly one week being the recommended period to leave it out of the packaging. However, it can easily be installed directly onto your subfloor.
When ready to start, place the floorboards out on the floor starting from the left-hand corner and leaving enough space for expansion. As you're laying wood flooring on concrete, your best option is to glue the flooring down using a Solid Wood Adhesive.
Apply your chosen adhesive to the subfloor and spread evenly using a notched trowel. Pressing down firmly as you go along and wiping away excess adhesive. Use a rubber mallet to lightly knock the boards together for a tight fit and then nail your beading or skirting around the edges.
Our Flooring Calculator
When you browse any type of flooring at Factory Direct Flooring Ltd, each product has a flooring calculator on the page. Simply enter the surface area in either metres or feet squared and our My Project flooring calculator will tell you how many packs you’ll need and how much it will cost you.
By simply measuring your room and entering your dimensions, we will provide you with an instant price which will show on every type of flooring you browse across our website. You can either input the total coverage or your width and length measurements, in meters or feet. You can even save your measurements room by room to make your shopping experience stress-free.
It also offers to add an extra 10% for wastage. While this may cost a little bit more, we highly recommend adding it just in case there are mishaps during the installation process. Enjoy the My Project flooring calculator below:
We hope this helps you install your new flooring! Visit our full advice centre for more information on laying flooring!